


Basic hard drive diagnostic: How to examine a failed hard drive
How to carry out a basic hard drive diagnostic
When confronted with a failed hard drive that isn’t recognized, clicks or if you are simply unable to access the data, you need to carry out a basic hard drive diagnostic. All hard drives, whatever the brand, are manufactured in the same way. They are all data storage devices using magnetic technology to save and retrieve information digitally. They all use one or more platters which are rigid rotating disks where the magnetic information is stored. The platters are linked to a head stack arm and the heads which read and write the data on the surface. Data on hard drives is stored and accessed randomly and not in a sequence which means that blocks of data can be retrieved in any order.
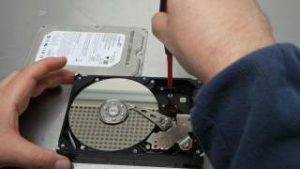
Technician opening a drive to carry out a basic hard drive diagnostic
When time is of the essence, and important data needs to be accessed without delay, carrying a well planned hard drive diagnostic is essential. In many cases of failed hard drives, the recovery can be a delicate process and making sure the diagnostic is done correctly, without damaging the drive any further and preventing the recovery of the data, is a priority.
Here are some general information and tips about the best way to examine a hard drive and carry out a basic hard drive diagnostic, whatever the capacity, type or brand.
Steps to examine a failed drive when doing a basic hard drive diagnostic
The most important advice first when dealing with a situation of loss data and data recovery is not do power up the hard drive or try to run it on an operating system without knowing where the fault is coming from as this could make the data completely unrecoverable. This is particularly true if the hard drive fell or received a shock. In some cases, the heads are stuck on the platters and powering on would scratch the surface where important information is located. In these cases, opening the hard drive is essential in order to be able to visually check the state of the heads.
Information about the failed hard drive from the owner
At Creative IT, when dealing with a hard drive recovery, we use a customer form to to find out as much information as possible about the drive and how it failed from the owner. Some of the questions we ask include:
- Which system is drive used with?
- What happened before the drive failed?
- When did the drive fail?
- What exactly happened when the drive failed? Did it have a shock or a fall?
- What is the current state of the drive? Does the drive spin, does it make clicking or knocking noises, is it recognized by the system, can some of the data be accessed?
- Has any data recovery attempt been made and if yes, which ones (software, opening of the hard drive, taken to another data recovery company etc…)?
- What folders, files or data are particularly important to the customer?
Once this information is gathered, we take the drive in our data recovery lab and start the initial steps for a basic hard drive diagnostic.
Basic hard drive diagnostic by visual inspection of the drive
In cases of physical damages due to a fall or a shock, the metallic casing of the drive will show some signs of dents or chips where the damage took place. This will give you a good indication as to what could be wrong with the drive. You can also have a look at the hard drive sticker and the screws of the casing to see if they have been tampered with. If yes, this will mean that someone else had tried to open the drive or work on it before you.
. It is always a good thing to shake the drive lightly from side to side to check if you can hear any moving parts inside it. This would be a sign of physical damage and will require to open the drive to check its state inside. Once done, you would get an idea of the components that have been affected.
Basic hard drive diagnostic by inspection of the PCB (Printed Circuit Board)
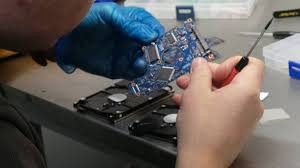
The PCB is checked thoroughly when doing a basic hard drive diagnostic
Once you have checked the drive overall, you need to concentrate on the PCB. When there are damages to the PCB, burn marks can be seen on it. In most cases, the hard drive no longer spin and emits ticking noises or no noise at all.
What’s a PCB?
For those that are novices, the PCB is a the circuit board of the hard drive that holds the electronic components. In the middle of the PCB, there is the MCU (Micro Controller Unit) which is the biggest chip on it and consists of a CPU (Central Processing Unit). The PCB also includes a Memory chip and a VCM controller (Voice Coil Controller). In some models of hard drives, you will find flash chips, in some others the flash contents are located in the MCU. The PCB is protected by shock sensors that will detect any excessive vibrations and shock and transmits the information to the VCM controller which will adjust the head movements to cope with the situation. Another important part of the PCB is a diode called the TVS (Transient Voltage Suppression diode) which detects power surges and prevents damages to the PCB.
One you have taken the PCB out of the hard drive, you need to check for burnt components, corrosion from liquid damage, traces of soldering as well as the presence and position of all the other components. You also need to check the head stack assembly pads which often play a role in problematics linked to unreliable connections. If they look unclean, use an eraser to clean them.
Basic hard drive diagnostic by doing an initial power on check
We use the PC-300 technology for our data recoveries and the initial power on check is done by connecting the drive to PC-3000. Holding the drive in one hand near the ear, you can listen to the sounds and the vibrations coming from the drive when it starts. If you hear an unhealthy noise coming from the drive such as a scratch or knocking sound, you need to be prepared to turn off the drive immediately and open it in an dust free environment to check the components inside.
Electronic diagnostic
If there aren’t any bad noises coming from the drive but if it doesn’t spin at all or spin too slowly, a number of electronic components need to be checked, including:
- Fuses and TVS diode on PCB
- Heads preamplifier: these can be damaged so it is always better to check them first as if they have a short circuit, they could damage a PCB replacement taken from a donor drive.
- Spindle motor (that holds the platters in place) to see if there is a disconnection or a short. The spindle motor can be tested using a multitester. If the windings are faulty, you will have to transplant the platters from the donor drive.
Software diagnostic
If, when you fist power on the drive, it spins correctly and doesn’t emit any strange sounds, you can then carry on the basic hard drive diagnostic with a software diagnostic. When switching on the power button, look at the Status Registers panel and check the behaviour.
As a general rule, there is three different status:
- Drive is ready: this means you can carry on with the diagnostic.
- Drive is busy: this means it’s carrying on some internal procedure. If this carries on for too long, the drive probably suffers from a PCB, head of service area problem.
- Connection problem. No PSY (chip) signal: this means that there is a connection problem and you need to try to replace the PCB
Using the information about the drive, you can then run the utility associated with it and evaluate the log information. You need to check the hard drive ID and see if the correct information is displayed with the right capacity. If the drive is in ready status, the correct ID and capacity will be displayed when starting the Universal utility. If the information contained in the Universal utility is correct, try to read the User area sector by running an Express test. Please note that it isn’t recommended to leave the drive unattended while doing these tests as they can cause serious damages if the drive has head of surfaces issues. If the user data can be read, you can start the data extraction, having creating a head map of the data first and making a copy of the data. This will help determine whether the problem is due to the heads or to the surface.
For more information about carrying out a hard drive diagnostic and book a data recovery, you can contact Creative IT.